
How to Remove Stains from Car Seats: Easy DIY Step-by-Step Guide
Stains on your car seats are frustrating, unsightly, and can permanently damage your interior if left untreated. Whether it's coffee, food, grease, or mystery stains from your kids, the good news is that most car seat stains can be removed at home with the right techniques and products. This comprehensive guide will walk you through exactly how to remove every type of stain from your car seats, using simple DIY methods that actually work.
Why Car Seat Stains Are So Stubborn
Car seats are designed to withstand daily use, but they are not stain-proof. The fabric or leather in your car seats can absorb liquids quickly, and once a stain sets in, it becomes significantly harder to remove. Heat from the sun accelerates the staining process, essentially baking the stain into the fibers. This is especially problematic in hot climates like Miami, where temperatures inside a parked car can exceed 140°F.
The type of material in your car seats also matters. Fabric seats are porous and absorb stains deeply, while leather seats have a protective coating that resists stains but can be damaged by harsh chemicals. Understanding your seat material is the first step to choosing the right cleaning method.
What You Will Need
Before you start, gather these supplies. Most of these items are inexpensive and can be found at any grocery store or auto parts shop.
Essential Supplies:
For Fabric Seats:
•Vacuum cleaner with upholstery attachment
•Spray bottle
•Soft-bristle brush or old toothbrush
•Microfiber towels (at least 3-4)
•Bucket of warm water
For Leather Seats:
•Vacuum cleaner
•Soft microfiber cloths (never use rough towels)
•Leather cleaner (pH-balanced)
•Leather conditioner
Cleaning Solutions (Choose Based on Stain Type):
General Purpose:
•Dish soap (Dawn or similar)
•White vinegar
•Baking soda
For Tough Stains:
•Rubbing alcohol (isopropyl alcohol 70%)
•Hydrogen peroxide (3%)
•Commercial upholstery cleaner (Resolve, Bissell, or similar)
For Grease/Oil:
•Cornstarch or baby powder
Step-by-Step Guide to Remove Stains from Fabric Car Seats
Step 1: Vacuum the Seats Thoroughly
Before applying any cleaning solution, vacuum the entire seat to remove loose dirt, crumbs, and debris. Use the upholstery attachment and get into the seams and crevices. This prevents you from turning dirt into mud when you add liquid cleaners.
Pro Tip: If you have a wet/dry vacuum, it will be extremely useful for extracting moisture after cleaning.
Step 2: Identify the Stain Type
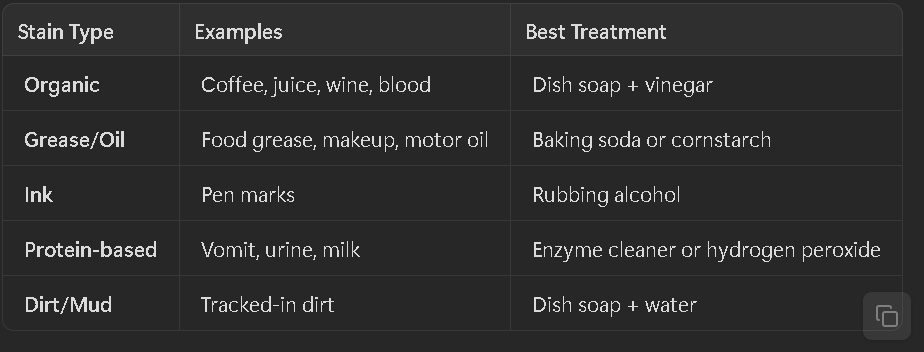
Step 3: Blot (Never Rub) Fresh Stains
If the stain is fresh, immediately blot it with a clean microfiber towel. Press down firmly to absorb as much liquid as possible. Never rub or scrub a fresh stain, as this pushes it deeper into the fabric fibers.
Work from the outside of the stain toward the center to prevent spreading. Continue blotting with a clean section of the towel until no more liquid transfers.
Step 4: Apply the Cleaning Solution
Now you will treat the stain based on its type.
For General Stains (Coffee, Juice, Soda):
Mix a cleaning solution of one tablespoon of dish soap, one tablespoon of white vinegar, and two cups of warm water in a spray bottle. Shake well to combine.
Spray the solution directly onto the stain, saturating it completely. Let it sit for 5-10 minutes to break down the stain. Use a soft-bristle brush or old toothbrush to gently scrub the stain in circular motions. The bristles will agitate the fibers and lift the stain without damaging the fabric.
For Grease or Oil Stains:
Sprinkle baking soda or cornstarch generously over the stain. These powders are highly absorbent and will pull the grease out of the fabric. Let it sit for at least 30 minutes, or overnight for old, set-in grease stains.
Vacuum up the powder. If the stain remains, apply a small amount of dish soap (which is designed to cut grease) directly to the stain. Add a few drops of water to create a paste, then scrub gently with a brush. Rinse with a damp cloth.
For Ink Stains:
Dampen a microfiber cloth with rubbing alcohol (70% isopropyl alcohol). Blot the ink stain, rotating to a clean section of the cloth frequently. The alcohol will dissolve the ink. Do not pour alcohol directly onto the seat, as too much liquid can spread the stain or damage the seat backing.
Once the ink is lifted, rinse the area with a cloth dampened with plain water to remove any alcohol residue.
For Protein-Based Stains (Vomit, Urine, Milk):
These stains require an enzyme-based cleaner or hydrogen peroxide to break down the proteins. If you do not have an enzyme cleaner, mix equal parts hydrogen peroxide and water in a spray bottle.
Spray the solution onto the stain and let it sit for 10-15 minutes. The hydrogen peroxide will bubble as it breaks down the proteins. Blot with a clean towel, then rinse with water.
Important: Test hydrogen peroxide on a hidden area first, as it can bleach some fabrics.
Step 5: Rinse the Area
After treating the stain, you need to rinse out the cleaning solution. Dampen a clean microfiber towel with plain water (not soaking wet, just damp) and blot the treated area to remove soap residue. Soap left in the fabric will attract dirt and make the area look dingy over time.
Step 6: Extract Excess Moisture
Use a dry microfiber towel to blot up as much moisture as possible. Press down firmly and hold for a few seconds to absorb water from deep in the cushion.
If you have a wet/dry vacuum, use it to extract even more moisture. This significantly speeds up drying time and prevents mold or mildew.
Step 7: Dry the Seats Completely
Leave your car windows open or park in a sunny spot to allow the seats to air dry completely. You can also use a fan or a hairdryer on a cool setting to speed up the process.
Never sit on damp seats, as this can cause the stain to reappear or create new stains from your clothing.
Step-by-Step Guide to Remove Stains from Leather Car Seats
Leather seats require a gentler approach than fabric seats. Harsh chemicals or excessive scrubbing can damage the protective coating and cause cracking.
Step 1: Vacuum the Seats
Use a soft brush attachment to vacuum the seats and remove any loose dirt or debris.
Step 2: Test Your Cleaner
Before applying any cleaner to the stain, test it on a hidden area (like under the seat or on the side) to make sure it does not discolor or damage the leather.
Step 3: Apply Leather Cleaner
Use a pH-balanced leather cleaner (available at auto parts stores). Spray a small amount onto a microfiber cloth (never spray directly onto the leather). Gently wipe the stained area in circular motions.
For stubborn stains, let the cleaner sit for 2-3 minutes before wiping.
Step 4: Wipe Clean
Use a separate damp microfiber cloth to wipe away the cleaner and any lifted dirt. Then dry the area with a clean, dry cloth.
Step 5: Condition the Leather
After cleaning, apply a leather conditioner to restore moisture and prevent cracking. This step is critical, especially in hot climates where leather dries out quickly.
Apply a small amount of conditioner to a cloth and massage it into the leather in circular motions. Let it absorb for 10-15 minutes, then buff with a clean cloth.
Common Mistakes to Avoid
Mistake 1: Using Bleach or Harsh Chemicals
Bleach will discolor fabric and destroy leather. Stick to mild cleaners like dish soap, vinegar, and specialized auto upholstery cleaners.
Mistake 2: Scrubbing Too Hard
Aggressive scrubbing damages fabric fibers and leather coatings. Always use gentle, circular motions with a soft brush.
Mistake 3: Using Too Much Water
Soaking your car seats can lead to mold, mildew, and a musty smell. Use damp cloths and extract as much moisture as possible after cleaning.
Mistake 4: Not Testing Cleaners First
Always test any new cleaner on a hidden area before applying it to a visible stain. This prevents accidental discoloration or damage.
Mistake 5: Letting Stains Sit
The longer a stain sits, the harder it is to remove. Treat stains as soon as possible for the best results.
When to Call a Professional
Some stains are simply too stubborn or too widespread to handle on your own. If you have tried multiple methods and the stain persists, or if you have large areas of staining, it may be time to call a professional detailer.
Professional detailers have access to commercial-grade extractors, steam cleaners, and specialized chemicals that can remove even the most stubborn stains without damaging your seats. They can also treat your entire interior to restore it to like-new condition.
If you are in the Miami area, Ale's Mobile Detailing offers professional interior cleaning services that can tackle any stain. We come to your location, so you do not have to waste time driving to a shop.
Preventing Future Stains
The best way to deal with car seat stains is to prevent them in the first place. Here are some simple tips:
Use Seat Covers: Invest in quality seat covers, especially if you have kids or pets. They are easy to remove and wash.
Apply Fabric Protector: After cleaning your seats, apply a fabric protector spray (like Scotchgard). This creates a barrier that repels liquids and makes future stains easier to clean.
Clean Spills Immediately: Keep a small pack of microfiber towels in your car. The moment a spill happens, blot it up before it has a chance to set.
Regular Vacuuming: Vacuum your car seats at least once a week to prevent dirt buildup. Dirt acts like sandpaper and wears down fabric over time.
Avoid Eating in the Car: This is the simplest solution. If you must eat in the car, use spill-proof containers and be extra careful.
Final Thoughts
Removing stains from your car seats does not have to be expensive or complicated. With the right supplies and techniques, you can tackle most stains at home and restore your interior to a clean, fresh condition. The key is to act quickly, use the right cleaner for the stain type, and avoid common mistakes like scrubbing too hard or using harsh chemicals.
If you have tried these methods and the stain persists, or if you simply want a professional touch, consider booking a professional interior detailing service. A deep clean from a pro can make your car look and smell brand new.
Have a stubborn stain you cannot remove? Drop a comment below and we will help you figure out the best solution!